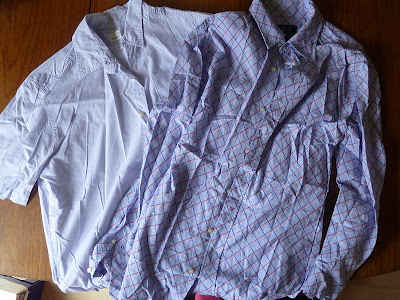
Today I am going to show you how I transformed my Dad's old shirts into shirts that I can wear but a bit more funky and something that you won't see everyone wearing. It's really quick and simple and the outcome is really fun.
What you will need:
2 Shirts (men or women's)
Sewing Machine
Thread
Fabric Scissors
Pins
These are the 2 shirts I am using, both are my Dad's old shirts but don't worrie he said I could cut them up! And sorry about the poor lighting, the next few photo's aren't too bad so I hope you can see what's going on.
Decide which shirt you want to keep as the main shirt and which you want to use for the front panel. Once you have decided, you want to cut out the front panel on whichever side you choose. Cut up the side of the shirt, around the front of the sleeve, along the shoulder and then around the collar keeping the collar all in tact. After that make sure you finish cutting off the sleeve and cut off the sleeve on the opposite side. You don't need to be too neat as you will be trimming these down later anyway if you are using a men's shirt.
As you can see the panel has now been removed from the shirt so you should now only have one half to the front out your shirt but still have a full collar.
Now, the panel that you just cut out of the first shirt you now need to cut out of the second shirt. What I like to do is take the panel from the first shirt, place it onto the second shirt and cut around it in the same way you did with the first shirt. This way it keeps it less complicated and you cut out the right side needed.
Next you need to pin the panel from the second shirt to the first shirt, all the way up the side, along the shoulder and along the collar joining it all together. Then sew.
Once you have stitched that your shirt should look something like this.
After I stitched it all I cut the sleeves a bit so that they didn't hang over my shoulders, but obviously that's personal choice. And that is basically it! I tie mine up at the front but if you didn't want to do that you could always finish off the shirt with a neat hem to the length you want.
So there it is! I hope this all made sense! Please let me know :) As you can see I also made another cheeky one at the same time! My Dad recently got rid of a load of clothes so I'm making use of them :)


Love this!! I will have to try it out as soon as I've figured out my sewing machine, I've had it for a coupe of months and I cant use it! (Well theres something wrong with the tension and i'm awful haha )
ReplyDeleteThankyou for sharing this!
x
Yes, please do! I would love to know how you got on! :) Oh no! Just have a fiddle and I'm sure it'll sort itself out :) xx
ReplyDeleteVery inspirational thank you ^_^
ReplyDelete